Graceful Upgrade with Canary Deployment using Pulumi

Windows 95 was a fantastic product. While it will be extremely rare to continue use Window 95 but without any upgrade.

Zero downtime is highly appreciated these days when the system is upgraded.

Canary deployment is commonly used to achieve a graceful upgrade with zero downtime.

This article uses Pulumi as the tool to achieve a graceful upgrade with zero interruption in a fully controlled manner.

What is Canary Deployment

Canary Deployment is a technique used to reduce the risk of introducing a new software version into production by slowly rolling out the change to a small subset of users and then rolling it out to the entire infrastructure and making it available to everybody.

For a detailed description, please refer to description at martinfowler.com

What is Pulumi?

Pulumi is an open source infrastructure as code tool for creating, deploying and managing cloud infrastructure. Pulumi works with traditional infrastructures like VMs, networks, and databases, in addition to modern architectures, including containers, Kubernetes clusters, and serverless functions. Pulumi supports dozens of public, private, and hybrid cloud service providers.

By using real languages in Pulumi for infrastructure as code will give you many benefits including: IDEs, abstractions including functions, classes, and packaging existing debugging and testing tools, and more. The result is greater productivity with far less copy and paste, and it works the same way no matter which cloud you’re targeting.

Other approaches use YAML, JSON, or proprietary domain-specific languages (DSLs) that you need to master and train your team to use. These alternative approaches reinvent familiar concepts like sharing and reuse, don’t tap into existing ecosystems, and are often different for every cloud that you need to target.

An Upgrade Scenario

Assume we have a web application with Nginx.

It is running in only version 1.17 in production with 3 replicas as in picture 1.

Then we will spin up another deployment with new version 2.18 and running one replica as in picture 2. Part of the traffic will be routed to a new version whiles most of the traffic is still running the old version which was bullet tested in the production environment before.

If things go smoothly we will reduce replicas to 2 on deployment 2.17 and increase replicas to 2 on 2.18 (see picture 3). Now more traffic will be routed to the new version and less traffic routed to the old version.

Now we can reduce the replicas of the old version deployment and increase the replicas of the new version deployment until all the load is gracefully upgraded. At this stage, we can decommission the old version deployment as in picture 4.

Step by Step

Same in the number of steps in the upgrade scenario still apply. The original state the canary upgrade has not started yet. Only version 1.17 in production with 3 replicas as in picture 1

Now set canary as true to start the canary deployment. We will spin up another deployment with new version 2.18 whilest running one replica as in picture 2. Part of the traffic will be routed to the new version whilest most of the traffic is still running the old version which was bullet tested in the production environment before.

If things go smoothly we reduce replicas to 2 on deployment 2.17 and increase replicas to 2 on 2.18 as in picture 3. Now more traffic will be routed to the new version and less traffic routed to the old version.

Now we can reduce the replicas of the old version deployment and increase the replicas of the new version deployment until all of the load has gracefully upgraded. At this stage, we can decommission the old version deployment as in picture 4.

Full Code

import * as k8s from "@pulumi/kubernetes";
import * as kx from "@pulumi/kubernetesx";

const appLabels = { app: "nginx" };

// create namespace with exact name "test" to avoid auto added suffix
const namespace = "test";
const namepapce_not_used = new k8s.core.v1.Namespace(namespace, {
    metadata: {
        name: namespace
    }
});

// Support rolling update of deployment
// max_surge, max_unavailable during rolling update
const versionProduction = "1.17";
const replicasProduction = 3;

const canary = false;
const replicasCanary = 2;
const versionCanary = "1.18";
if (canary) {
    const appLabelsCanary = { app: "nginx", version: "nginx-" + versionCanary };

    // the logical name has to be unique, so use version name as the deployment name
    const deploymentCanary = new k8s.apps.v1.Deployment("nginx-" + versionCanary, {
        metadata: {
            namespace: namespace
        },
        spec: {
            selector: { matchLabels: appLabelsCanary },
            strategy: { 
                rollingUpdate: { maxSurge: 2, maxUnavailable: 2 }, 
                type: "RollingUpdate" },
            replicas: replicasCanary,
            template: {
                metadata: { labels: appLabelsCanary },
                spec: { containers: [{ 
                    name: "nginx", 
                    image: "nginx:" + versionCanary, 
                    ports: [{ containerPort: 80 }] }] }
            }
        }
    });
}

const appLabelsProduction = { app: "nginx", version: "nginx-" + versionProduction };
const deploymentProduction = new k8s.apps.v1.Deployment("nginx-" + versionProduction, {
    metadata: {
        namespace: namespace
    },
    spec: {
        selector: { matchLabels: appLabelsProduction },

        replicas: replicasProduction,
        template: {
            metadata: { labels: appLabelsProduction },
            spec: { containers: [{ 
                name: "nginx", 
                image: "nginx:" + versionProduction, 
                ports: [{ containerPort: 80 }] }] }
        }
    }
});

const service = new k8s.core.v1.Service("nginx", {
    metadata: {
        name: "nginx",
        labels: { app: "nginx" },

        namespace: namespace
    },
    spec: {
        type: "NodePort",
        ports: [{ port: 80, targetPort: 80, nodePort: 32174 }],
        selector: { app: "nginx" }

    }
})

export const name = deploymentProduction.metadata.name;

Environment

If you want to try out there 5 steps to follow.

Read More

Engineers' preference as an employee - A small survey

Engineers’ preference as an employee - A small survey

As an engineer, I value certain things more than the others as an employee. To have a comprehensive view on the perference, an anonymous survey was conducted on the attendees in a technical meetup event Big Data and Machine Learning Pipeline @ Tink. Apache Spark is used to anaylze the survey data in case that the data size increases in the future.

The question used in this survey is What is the Most Important Thing to You as an Employee.

Survey Answer Rate

Here is a short code to load the survey data and get the count of attendees who answered the survey, and who does not answered.

from pyspark.sql.functions import *
df = spark.read.text("survey.md")
answered = df.filter("trim(value) == ''").count()
not_answered = df.count() - answered

Among 130 attendees, 62 answered, 68 not answered.

Natural Language Processing (NLP)

Here is the spark code to do NLP: tokenizing into words, stemming the words and removing the stop words.

spark-shell --packages com.github.master:spark-stemming_2.10:0.2.1

import org.apache.spark.mllib.feature.Stemmer
import org.apache.spark.ml.feature.StopWordsRemover

val survey = spark.read.textFile("./survey.md")
val not_empty = survey.filter("trim(value) != ''")
val words = not_empty.map(v => v.toLowerCase.split("\\s")).toDF("words")
                    
val stemmed = (new Stemmer()
  .setInputCol("words")
  .setOutputCol("stemmed")
  .setLanguage("English")
  .transform(words))

val remover = (new StopWordsRemover()
  .setInputCol("stemmed")
  .setOutputCol("removed"))
val removed = remover.transform(stemmed)

Here is a word cloud generated with a word count tool.

The most frequently mentioned word

From the word cloud, the most mentioned word is learn. Here is a short code to get the information of the answer with most frequently mentioned word.

df_learn = df.filter(lower(col("value")).contains("learn"))
no_learn = df_learn.count()
df_learn.show(no_learn, False)

There are totally 12 attendees mentioned learn. (# One attendee answer was Machine Learning, which is not exactly the same with other learn mean)

Some interesting outcomes:

Beside the most frequently mentiond word learn, here are some of interesting answers.

  • Challenging work with talented people
  • Quality leadership
  • Delevering code bug free and with optimum performance

Thanks for all the attendees give the answer.

Learning is simply important according to the survey, while the question is more about How to create a learning culture?

And What is the Most Important Thing to You as an Employee?

Read More

An End-to-End Way to Publish MarkDown Stories to Medium

medium.com is a great platform with many great articles. While publishing stories from markdown files to medium is not as smooth as it could be. Here is one way end to end way to publish markdown stories to medium.

Tools used

NOTE: It might work directly import from github.io with jekyll-now.

publish-to-medium-flow

Write in Markdown

This is a normal step to write down the idea. Tools like MacDown enable us to see the direct effact.

Article Title

Jykell using file name to annotable the title of the article. For example, file 2019-04-30-Nginx-Tutorial-Step-by-Step-with-Examples.md will have title Nginx Tutorial Step by Step with Examples.

While title in medium need use the top header like

# Nginx Tutorial Step by Step with Examples

Article Tags

Jykell using tags like the following example, so that can be optimized by SEO.

---
layout: post
title: Nginx Tutorial Step by Step with Examples
comments: true
tags: nginx, reverse proxy, load balancer, CDN, content cache
---

This how ever need be removed after pasted medium. And need be added manually on medium. This will be covered in the last section Modify in Medium

Kbd tag

<kbd> tab will be rendered niced on Jykell. like tab

While this is not supported on Medium. An easiest way will be using bold by quoted with **.

Screenshot for Tables

Medium does not support tables with markdown. One of the way to use tables will be take screenshot.

Add Tables to Markdown

Write something like this.

| Country | Capital |
|:--------|:--------|
|China    |Beijing  |
|Sweden   |Stockholm|
  • ** Country Capital ** is the header.
  • ** :——– :——– ** is the separation between the header and content.
  • Other rows are content

It will be rendered nicely by MacDown like this.

Country Capital
China Beijing
Sweden Stockholm

Screenshot for Tables

Take screenshot for all the tables with Command + Shift + 4.

Modify screenshot filenames

Copy all screenshot file to images folder of the jykell-now repo

Add images to markdown

In Jykell and MacDown, we can use relative path like

![screenshot](../images/screenshot.png)

It will not be able to resolved when we import to medium. So we need use absolute folder instead, like this.

![screenshot](https://knockdata.github.io/images/screenshot.png)

Markdown to Medium

Copy and Paste the markdown content to http://markdown-to-medium.surge.sh/ on the left pane.

Copy the content on the right pane.

Create a new story on medium and paste the content.

Modify on Medium

Remove table content in markdown format

table content in markdown format is the orginal content we wanna keep in markdown as plain text for future editing.

This need be deleted on medium.

Add Tags

Add Cover Images

First Chapter

Medium treat the first chapter (140 characters) as abstract. It might need be adjusted a bit.

Read More

Nginx Tutorial Step by Step with Examples

Nginx is a web server which can also be used as a reverse proxy, load balancer, mail proxy and HTTP cache. The software was created by Igor Sysoev and first publicly released in 2004.

I got a chance to work with a project using nginx intensively. On the way, I spend some time experimenting with it. Here I record down my exploration of nginx.

The article will cover nginx runnable examples from basic web servers, HTTPS termination, reverse proxy, load balancing and content cache.

Step 0 - Environment Preparation

We can install nginx in a physical machine, a virtual machine, a docker container.

For fast experient, I use docker for all the examples below. There are two prerequisites needed for the following examples

  • Docker Installed
  • Have Internet Connection, might need turn off VPN, firewall if you are with some company network.

Fow Mac and Window, we can use docker desktop. Just download from the link, and install it.

For Linux, download a docker image with your preferred distribution using one of the links below.

Step 1 - A Simple HTTP Server

We will use the official nginx docker image in the article. The version tested is 1.15. Other version shall working as well.

Execute the following command

docker run -it --name nginx --rm -p 8080:80 nginx:1.15
option meaning
-it : interactive model
–name nginx the docker container name is nginx so that we can easily removed later
–rm. : remove the container if we stop it
-p 8080:80 map container port 80 to 8080 of the host
nginx:1.15 Using nginx image, with specific version 1.15

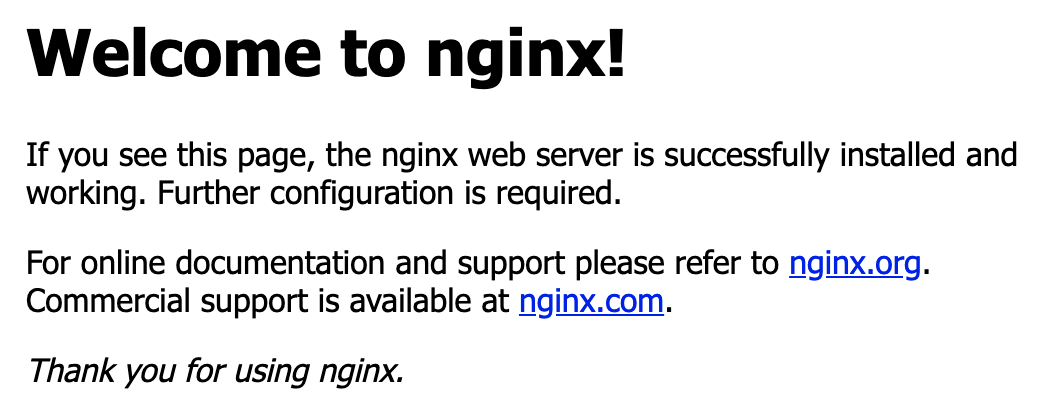
We can now open this link http://localhost:8080/ with a web browser. Something like this shall appear.

nginx-tutorial-welcome-to-nginx

Step 2 - A Simple File Server

By default, nginx’s main configuration is /etc/nginx/nginx.conf. From the configuration file nginx.conf, we shall notice some lines like this which is used to include sub configuration files

include /etc/nginx/conf.d/*.conf;

The nginx image comes with a default configuration file /etc/nginx/conf.d/default.conf. It shall have some content like this.

server {
    listen       80;
    server_name  localhost;
	
    location / {
        root   /usr/share/nginx/html;
        index  index.html index.htm;
    }
}
configuration line meaning
server server block use the server_name and listen directives to bind to tcp sockets. It serve similar function as Apache
listen 80; listen to port 80, by default it’s HTTP port, in the next example we will use HTTPS
server_name localhost; It can be a domain name or just simple a machine name
location / location block, / correspond to root location. for example the data will be get from folder /usr/share/nginx/html when we access http://localhost/
root /usr/share/nginx/html; root folder for the location block, files include files in sub directories can be accessed with the location.
index index.html index.htm; if we do not specify file, but only directory, it will first looking for index.html, if could not find index.html try index.htm

Run the following command to start a simple file server. We are set the current folder $(pwd) as the root folder. It will be accessable by http://localhost:8080/.

docker run -d --name nginx --rm -p 8080:80 -v $(pwd):/usr/share/nginx/html nginx:1.15

Now we can access the files in the folder. Depending on the file type, the browser might just open it, or download it.

The default configuration inside the docker container can be checked with following command

docker exec -it nginx cat /etc/nginx/nginx.conf
docker exec -it nginx cat /etc/nginx/conf.d/default.conf

Step 3 - HTTPS

Data is not encrypted on transit when we using HTTP. It means any machine along the way will be able to see the data you send and received. For example, all machine connected to the same WIFI hotspot as you will be able to see your content.

HTTPS provide encryption for data on transit. Machines along the way will only see the encrypted data.

For HTTPS to work, we need to generate a keypair and obtain a certificate for the public key. There are various alternative for obtaining a certificate.

  • Using self signed certificate
  • Obtain a free public key certificate through https://letsencrypt.org/
  • Obtain public key certificate through a third party certificate authority.

For simplicity, we will just be using a self signed certificate.

Run the following command to generate a certificate and a private key. Just accept all the default values.

openssl req -x509 -nodes \
  -days 365 \
  -newkey rsa:2048 \
  -keyout example.key \
  -out example.crt

Create a configuration file https.conf with following content.

server {
    listen 443 ssl;
    server_name www.example.com;
	
    ssl_certificate /etc/nginx/ssl/example.crt;
    ssl_certificate_key /etc/nginx/ssl/example.key;

    location / {
        root /usr/share/nginx/html;
        index index.html index.htm;
    }
}

Compare to the previous configuration for HTTP. There are few differences which listed in the following table

configuration line meaning
listen 443 ssl; Listening on port 443, with SSL encryption on
ssl_certificate /etc/nginx/ssl/example.crt; SSL certificate file, either created with self signed way or obtained
ssl_certificate_key /etc/nginx/ssl/example.key; SSL certificate key, the private key for the certificate

Run the following command. The configuration, certificate, and key are mounted in the command.

docker run -it --rm --name nginx -p 8443:443 \
    -v $(pwd)/https.conf:/etc/nginx/conf.d/https.conf \
    -v $(pwd)/example.key:/etc/nginx/ssl/example.key \
    -v $(pwd)/example.crt:/etc/nginx/ssl/example.crt nginx:1.15

Open a browser with link https://localhost:8443. We will just be warned by the browser that you connection is not private. Something like this.

nginx-tutorial-https-alarm-connection-is-not-private.png

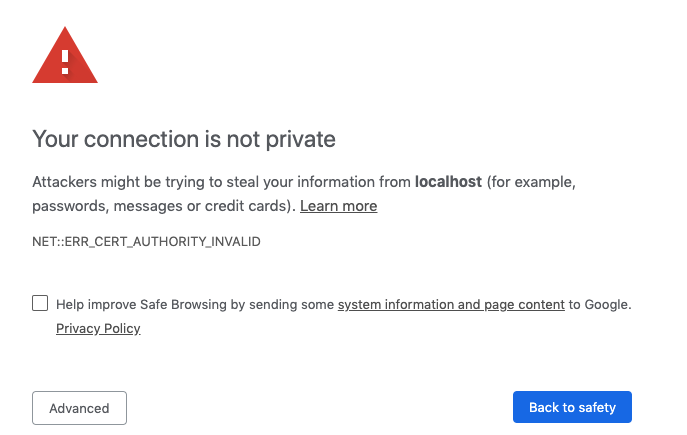
Just click Adavand, and Proceed to localhost (unsafe).

Step 4 - Some Random Web Server

We need a web server for next two examples Reverse Proxy and Load Balancer.

Node.js is one of the most popular web server. We will use it to create two random web servers. It will just listening

Create a file name serving.js with following content.

const http = require('http')
const os = require('os')
const port = 3000

const requestHandler = (request, response) => {
  console.log(request.url)
  setTimeout(function() {
    response.end('Hello, This is machine learning model serving application! from ' + os.hostname())
    }, 3000);

}

const server = http.createServer(requestHandler)

server.listen(port, (err) => {
  if (err) {
    return console.log('something bad happened', err)
  }

  console.log(`server is listening on ${port}`)
})

Create another file name seaching.js with following content.

const http = require('http')
const os = require('os')
const port = 3000

const requestHandler = (request, response) => {
  console.log(request.url)
  setTimeout(function() {
    response.end('Hello, This is machine learning model hyper parameters searching Server! from ' + os.hostname())
    }, 3000);

}

const server = http.createServer(requestHandler)

server.listen(port, (err) => {
  if (err) {
    return console.log('something bad happened', err)
  }

  console.log(`server is listening on ${port}`)
})

The two files, serving.js and searching.js are almost identical with only small different to the response message. They are just listening on port 3000 and return back a message. The response message also include the hostname, so that we know which server was processing the request.

Run the following command to start the serving application.

docker run -it --rm --name serving \
  -p 3000:3000 \
  -v $(pwd)/serving.js:/bin/serving.js \
  node:11.12 node /bin/serving.js

Run the following command to start the searching application.

docker run -it --rm --name searching \
  -p 3001:3000 \
  -v $(pwd)/searching.js:/bin/searching.js \
  node:11.12 node /bin/searching.js

Access http://localhost:3000 for the model seving application.

Access http://localhost:3001 for the model searching application.

Step 5 - Reverse Proxy

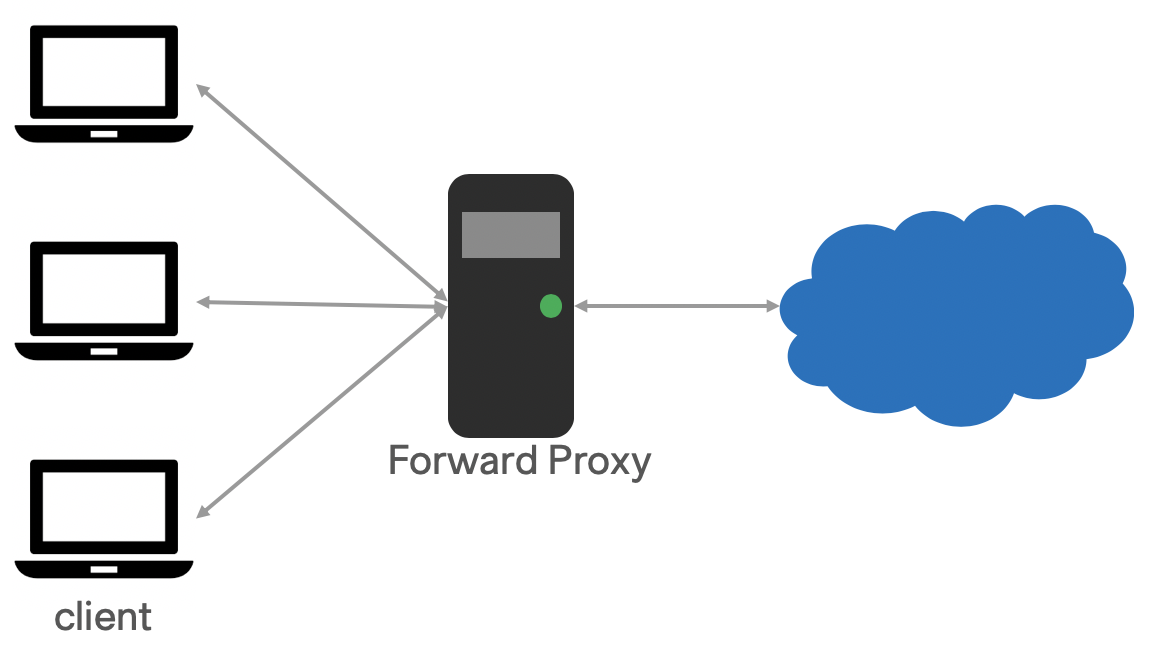
Proxy (or sometime called Forward Proxy) is used when we wanna access internet from internal network. The computer on the boundary is acting as a proxy server. In the following image, there are 3 clients connect to the Forward Proxy. And the foward proxy is the only communication port to internet.

forward proxy

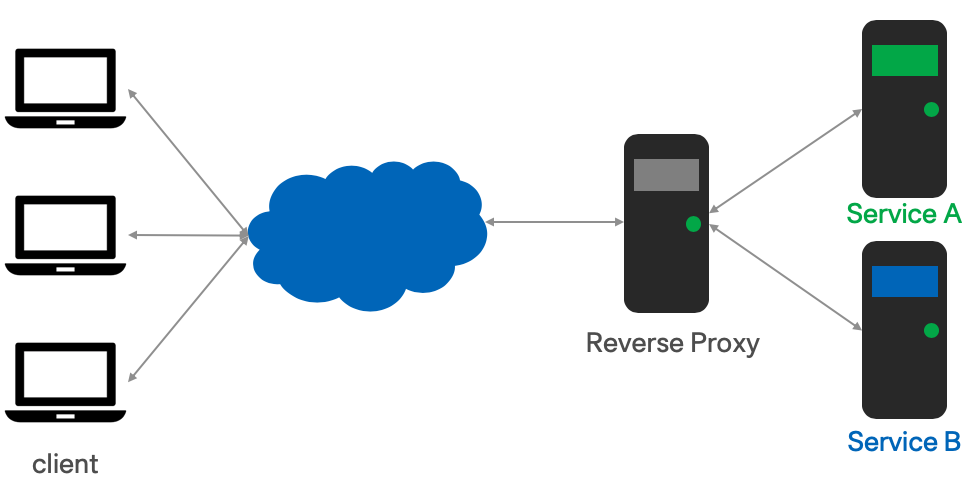
Reverse Proxy on the other side is used when internet user wanna access services inside a data center. The computer on the boundary is acting as reverse proxy. It provide a single entry for different services hosted inside a data center. In quite quite some cases a Reverse Proxy is used to terminiate HTTPS traffic, so that the internal service don’t have to deal with security setup.

reverse proxy

We will use docker-compose for the example. Create file docker-compose.yml with following content. 3 instances is included in the docker-compose, a nginx act as Reverse Proxy, serving service, and searching service.

version: '3'
services:
  nginx:
    image: nginx:1.15
    ports:
      - "8080:80"
      - "8443:443"
    volumes:
      - ./http.conf:/etc/nginx/conf.d/default.conf
      - ./https.conf:/etc/nginx/conf.d/https.conf
      - ./example.key:/etc/nginx/ssl/example.key
      - ./example.crt:/etc/nginx/ssl/example.crt
    depends_on:
      - serving
      - searching
  serving:
    image: node:11.12
    hostname: serving
    ports:
      - "3000:3000"
    volumes:
      - ./serving.js:/bin/serving.js
    command: bash -c "node /bin/serving.js"
  searching:
    image: node:11.12
    hostname: searching
    ports:
      - "3001:3001"
    volumes:
      - ./searching.js:/bin/searching.js
    command: bash -c "node /bin/searching.js"

Create file http.conf with following content. It listen on port 80, with plain HTTP. It will forward all the traffic to http://serving:3000/ if accessed with /serving/; and will forward all the traffic to http://searching:3001/ if accessed with /searching/

server {
  listen 80;
  location /serving/ {
    proxy_pass http://serving:3000/;
  }

  location /searching/ {
    proxy_pass http://searching:3001/;
  }
}

Create file https.conf with following content. The foward setup is extractly as http.conf. The only difference is it listen on port 443 with SSL encryption. In this case it used as HTTPS termination. The traffic coming in, is encypted on port 443, then forward to an unecrypted service on HTTP.

server {
    listen 443 ssl;

    ssl_certificate /etc/nginx/ssl/example.crt;
    ssl_certificate_key /etc/nginx/ssl/example.key;

    location /serving/ {
        proxy_pass http://serving:3000/;
    }

    location /searching/ {
        proxy_pass http://searching:3001/;
    }
}

Run the following command to start the whole cluster

docker-compose up

We can now access, which works as pure reverse proxy

We can now access, which works as HTTPS termination, and reverse proxy at the same time.

Step 6 - Load Balancer

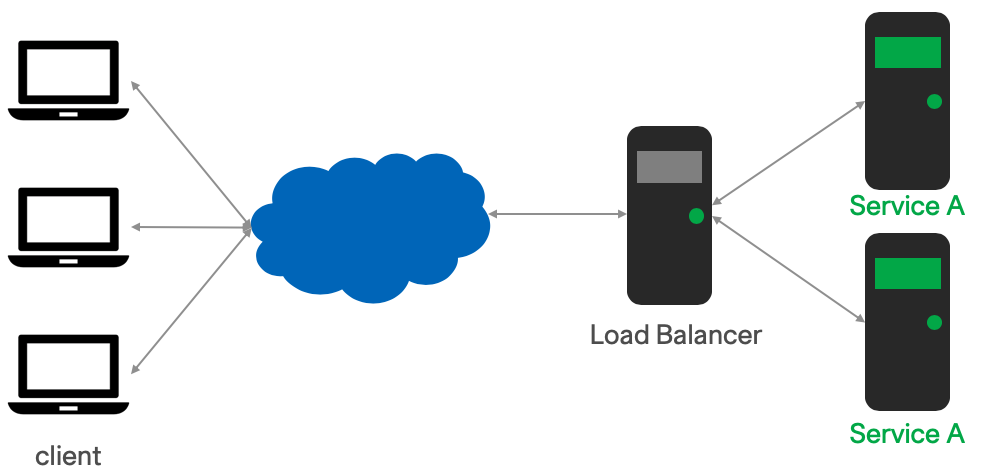
Load Balancers are very similar with reverse proxy. Reverse Proxy will direct traffic to different services based on the URL or ports.

While Load Balancer will direct traffic to the same services. It can be used for purpose like

  • Increase total capacity
  • Reduce response time
  • Achieve high availability
  • Rolling upgrade

load balancer

The main configure item to have load balancer is upstream in nginx. Here comes a sample configuration.

upstream servings {
    server "serving1:3000";
    server "serving2:3000";
}

server {
    listen 443 ssl;

    ssl_certificate /etc/nginx/ssl/example.crt;
    ssl_certificate_key /etc/nginx/ssl/example.key;


    location / {
        root /usr/share/nginx/html;
        index index.html index.htm;
    }

    location /serving/ {
        proxy_pass http://servings/;
    }
}

One upstream servings is defined in the example. It includes two servers, serving1:3000 and serving2:3000. The upstream servings can then be used like a normal server like in the example.

Create a docker-composer file with following content.

version: '3'
services:

  serving1:
    image: node:11.12
    hostname: serving1
    ports:
      - "3000:3000"
    volumes:
      - ./serving.js:/bin/serving.js
    command: bash -c "node /bin/serving.js"
  serving2:
    image: node:11.12
    hostname: serving2
    ports:
      - "3000:3000"
    volumes:
      - ./serving.js:/bin/serving.js
    command: bash -c "node /bin/serving.js"

  nginx:
    image: nginx:1.15
    ports:
      - "8080:80"
      - "8443:443"
    volumes:
      - ./http.conf:/etc/nginx/conf.d/default.conf
      - ./https.conf:/etc/nginx/conf.d/https.conf
      - ./example.key:/etc/nginx/ssl/example.key
      - ./example.crt:/etc/nginx/ssl/example.crt
    depends_on:
      - serving1
      - serving2

Run the following command to start the whole cluster setup

docker-compose up

We can now access, which works as load balancer. The response message include the node to process it. Try to refresh couple times, the message shall change randomly.

Step 7 Content Cache

The performance of applications and web sites is a critical factor in their success. People are not patient enough to wait half minutes just wanna to see a web page.

In many cases the end user experience of your application can be improved by focusing on some very basic application delivery techniques. One such example is by implementing and optimizing caching in your application stack. nginx is quite widely as content cache layer, in front of other services.

We will use mostly same as previous example on Load Balancer. The first difference is add a 3 seconds to delay the reponse.

const requestHandler = (request, response) => {
  console.log(request.url)
  setTimeout(function() {
    response.end('Hello, This is machine learning model serving application! from ' + os.hostname())
    }, 3000);
}

The other change is add cache configuration, like this.

upstream servings {
    server "serving1:3000";
    server "serving2:3000";
}

proxy_cache_path /tmp/cache levels=1:2 keys_zone=my_cache:10m max_size=10g inactive=60m use_temp_path=off;

server {
    listen 443 ssl;

    ssl_certificate /etc/nginx/ssl/example.crt;
    ssl_certificate_key /etc/nginx/ssl/example.key;

    location / {
        root /usr/share/nginx/html;
        index index.html index.htm;
    }

    location /serving/ {
        proxy_pass "http://servings/";
        proxy_buffering        on;
        proxy_cache            my_cache;
        proxy_cache_valid      200  1d;
        proxy_cache_use_stale  error timeout invalid_header updating
        http_500 http_502 http_503 http_504;
    }
}

The most important part is proxy_cache_path which the cache will be stored.

Run the following command to start the whole cluster setup

docker-compose up

Access https://localhost:8443/serving. And try to refresh. You shall notice, the response will return in 3 seconds. While for the later access with reflesh it, you will get the the response immediately since it is cached by nginx.

We can check the cache content inside the nginx server. Attach to docker container with command docker exec -it step7-cache_nginx_1 bash. All the cache content are under /tmp/cache

root@6a2082f9692f:/tmp/cache# cat /tmp/cache/f/e9/6999fdd42906a0737533b155d95a5e9f 
?=?\????????[?\uz?lg?
KEY: http://servings/
HTTP/1.1 200 OK
Date: Tue, 09 Apr 2019 19:02:51 GMT
Connection: close

Hello, This is machine learning model serving application! from serving1

References

Nginx is a powerful application. There are many things can be realized with nginx. I bared scratch the surface of a big iceberg.

All the code can be found on https://github.com/rockie-yang/explore-nginx

Here is a list of doc, I refered.

Read More

Spark Window Function - PySpark

Spark Window Function - PySpark

Window (also, windowing or windowed) functions perform a calculation over a set of rows. It is an important tool to do statistics. Most Databases support Window functions. Spark from version 1.4 start supporting Window functions.

Spark Window Functions have the following traits:

  • perform a calculation over a group of rows, called the Frame.
  • a frame corresponding to the current row
  • return a new value to for each row by an aggregate/window function
  • Can use SQL grammar or DataFrame API.

Spark supports multiple programming languages as the frontends, Scala, Python, R, and other JVM languages. This article will only cover the usage of Window Functions with PySpark DataFrame API.

It is very similar for Scala DataFrame API, except few grammar differences. Please refer to spark-window-function on medium

For the usage of Windows function with SQL API, please refer to normal SQL guide.

Import all needed package

Few objects/classes will be used in the article. Just import them all here for simplicity.

from pyspark.sql import Window
from pyspark.sql.types import *
from pyspark.sql.functions import *

Sample Dataset

The sample dataset has 4 columns,

  • depName: The department name, 3 distinct value in the dataset.
  • empNo: The identity number for the employee
  • name: The name of the employee
  • salary: The salary of the employee. Most employees have different salaries. While some employees have the same salaries for some demo cases.
  • hobby: The list of hobbies of the employee. This is only used for some of the demos.

Here is the sample dataset

sample-dataset

The following code can be used to create the sample dataset

empsalary_data = [
  ("sales",     1,  "Alice",  5000, ["game",  "ski"]),
  ("personnel", 2,  "Olivia", 3900, ["game",  "ski"]),
  ("sales",     3,  "Ella",   4800, ["skate", "ski"]),
  ("sales",     4,  "Ebba",   4800, ["game",  "ski"]),
  ("personnel", 5,  "Lilly",  3500, ["climb", "ski"]),
  ("develop",   7,  "Astrid", 4200, ["game",  "ski"]),
  ("develop",   8,  "Saga",   6000, ["kajak", "ski"]),
  ("develop",   9,  "Freja",  4500, ["game",  "kajak"]),
  ("develop",   10, "Wilma",  5200, ["game",  "ski"]),
  ("develop",   11, "Maja",   5200, ["game",  "farming"])]

empsalary=spark.createDataFrame(empsalary_data, 
    schema=["depName", "empNo", "name", "salary", "hobby"])
empsalary.show()

Spark Functions

There are hundreds of general spark functions in which Aggregate Functions and |Window Functions categories are related to this case.

spark-function-categories

Functions in other categories are NOT applicable for Spark Window.

The following example using the function array_contains which is in the category of collection functions. Spark will throw out an exception when running it.

overCategory = Window.partitionBy("depName")
                                  
df = empsalary.withColumn(
  "average_salary_in_dep", array_contains(col("hobby"), "game").over(overCategory)).withColumn(
  "total_salary_in_dep", sum("salary").over(overCategory))
df.show()

Basic Frame with partitionBy

A Basic Frame has the following traits.

  • Created with Window.partitionBy on one or more columns
  • Each row has a corresponding frame
  • The frame will be the same for every row in the same within the same partition. (NOTE: This will NOT be the case with Ordered Frame)
  • Aggregate/Window functions can be applied on each row+frame to generate a single value

basic-window-function

In the example, in the previous graph and the following code, we calculate

  • using function avg to calculate average salary in a department
  • using function sum to calculate total salary in a department

Here is the sample code

overCategory = Window.partitionBy("depName")
df = empsalary.withColumn(
  "salaries", collect_list("salary").over(overCategory)).withColumn(
  "average_salary", (avg("salary").over(overCategory)).cast("int")).withColumn(
  "total_salary", sum("salary").over(overCategory)).select(
   "depName", "empNo", "name", "salary", "salaries", "average_salary", "total_salary")
df.show(20, False)

Here is the output from the previous sample code.

output-basic-window

From the output, we can see that column salaries by function collect_list has the same values in a window.

Read More

Spark Window Function - PySpark

Window (also, windowing or windowed) functions perform a calculation over a set of rows. It is an important tool to do statistics. Most Databases support Window functions. Spark from version 1.4 start supporting Window functions.

Spark Window Functions have the following traits:

  • perform a calculation over a group of rows, called the Frame.
  • a frame corresponding to the current row
  • return a new value to for each row by an aggregate/window function
  • Can use SQL grammar or DataFrame API.

Spark supports multiple programming languages as the frontends, Scala, Python, R, and other JVM languages. This article will only cover the usage of Window Functions with Scala DataFrame API. It is very similar for Python DataFrame API, except few grammar differences.

For the usage of Windows function with SQL API, please refer to normal SQL guide.

Import all needed package

Few objects/classes will be used in the article. Just import them all here for simplicity.

import org.apache.spark.sql.expressions.Window
import org.apache.spark.sql.types._
import org.apache.spark.sql.functions._

Sample Dataset

The sample dataset has 4 columns,

  • depName: The department name, 3 distinct value in the dataset.
  • empNo: The identity number for the employee
  • salary: The salary of the employee. Most employees have different salaries. While some employees have the same salaries for some demo cases.
  • hobby: The list of hobbies of the employee. This is only used for some of the demos.

Here is the sample dataset

sample-dataset

The following code can be used to create the sample dataset

case class Salary(depName: String, empNo: Long, name: String, 
    salary: Long, hobby: Seq[String])
val empsalary = Seq(
  Salary("sales",     1,  "Alice",  5000, List("game",  "ski")),
  Salary("personnel", 2,  "Olivia", 3900, List("game",  "ski")),
  Salary("sales",     3,  "Ella",   4800, List("skate", "ski")),
  Salary("sales",     4,  "Ebba",   4800, List("game",  "ski")),
  Salary("personnel", 5,  "Lilly",  3500, List("climb", "ski")),
  Salary("develop",   7,  "Astrid", 4200, List("game",  "ski")),
  Salary("develop",   8,  "Saga",   6000, List("kajak", "ski")),
  Salary("develop",   9,  "Freja",  4500, List("game",  "kajak")),
  Salary("develop",   10, "Wilma",  5200, List("game",  "ski")),
  Salary("develop",   11, "Maja",   5200, List("game",  "farming"))).toDS
empsalary.createTempView("empsalary")
empsalary.show()

Spark Functions

There are hundreds of general spark functions in which Aggregate Functions and |Window Functions categories are related to this case.

spark-function-categories

Functions in other categories are NOT applicable for Spark Window.

The following example using the function array_contains which is in the category of collection functions. Spark will throw out an exception when running it.

val overCategory = Window.partitionBy('depName)
val df = empsalary.withColumn(
  "average_salary_in_dep", array_contains('hobby, "game") over overCategory).withColumn(
  "total_salary_in_dep", sum('salary) over overCategory)
df.show()

Basic Frame with partitionBy

A Basic Frame has the following traits.

  • Created with Window.partitionBy on one or more columns
  • Each row has a corresponding frame
  • The frame will be the same for every row in the same within the same partition. (NOTE: This will NOT be the case with Ordered Frame)
  • Aggregate/Window functions can be applied on each row+frame to generate a single value

basic-window-function

In the example, in the previous graph and the following code, we calculate

  • using function avg to calculate average salary in a department
  • using function sum to calculate total salary in a department

Here is the sample code

val overCategory = Window.partitionBy('depName)
val df = empsalary.withColumn(
  "salaries", collect_list('salary) over overCategory).withColumn(
  "average_salary", (avg('salary) over overCategory).cast("int")).withColumn(
  "total_salary", sum('salary) over overCategory).select(
   "depName", "empNo", "name", "salary", "salaries", "average_salary", "total_salary")
df.show(false)

Here is the output from the previous sample code.

output-basic-window

Read More

Hdf5 File Handling

HDF5 is a file format which to store numerical data. It is widely used in Machine Learning space.

There are two main concept in HDF5

  • Groups: work like dictionaries
  • Datasets: work like NumPy arrays

HDF5View application to view HDF file

HDF5View can be downloaded from hdfgroup web page.

Open a file will have a view like this to navigate.

HDF5View

There is also a python library hdf5Viewer While it does not support Python3. And there few dependencies not easy to fulfill on Mac

HDF5 Handling with Python

Install h5py package

pip install h5py

Import package

import h5py

Open a file

train_dataset = h5py.File('datasets/train_catvnoncat.h5', "r")
Read More

Supervised Learning Explained 1

What is Supervised Learning

There are few types of machine learning. Supervised Learning is one of them.

The fundamental concept is letting a system learn from lots of labeled data.

After the learning, the system will be able to predict the result when new data come.

This is supervised learning.

Labeled data means, we know the meaning of our data. Example can be,

  • Given fact, like house size, location, year of build, we know the price. Here the price is the label. House size, location and year of build are called features.
  • Given a photo, we know whether is a cat. Here whether is a cat is the label. And photo is the features.

How Learn a Cat is a Cat

When we were young, someone, likely our parents, told us that is a cat when we see a cat.

So we just looked at the cat visually and label it as a cat.

And late on, when we see a cat, we predict it.

  • Sometime we are right, our parents will say good job.
  • Sometime we are left, our parents will say, no, that is a cat.

Over time, we will get better predication, super close to 100%.

Our parents are our supervisor in that case. We are learning in supervised way.

Before Learning

Without previous knowledge, let a system tell whether a photo is a cat.

The system is a plain cubic box, it can only guess randomly. So the accuracy is 50%.

plain-box-supervised-learning

Read More

Change Jekyll Default excerpt_separator

Jekyll will take first part of a blog post and display it. The break point is called excerpt_separator,

The default excerpt_separator is “\n\n”, see jekyll configuration. The ruby file provide this configure is in configuration

While using “\n\n”, posts will be most likely break at very early part. Due to heavy usage or new lines in markdown.

Fortunately we can configured it in file _config.yml like

excerpt_separator: "
Read More

Setup Blog with jekyll-now on github

There are many ways setup blogs. With jekyll-now, it only takes few minutes, just with few steps.

  1. login to your own github account
  2. clone jekyll-now
  3. rename the repos to yourname.github.io
  4. clone to your local computer git clone https://github.com/yourname/yourname.github.io.git
  5. modify _config.yml with the right configuration
  6. start blog by adding markdown files under folder _posts
  7. push to github, and your blog will be there
Read More